Introduction
We have Wi-Fi networks almost everywhere, such as in our homes, workplaces, and other places. Some Wi-Fi networks are for public usage and can provide data service to numerous users. On the other hand, some private Wi-Fi networks have limited access since they have password protection. This is why we can not connect to a secure network without authentication. Hence it is necessary to secure them by changing their passwords regularly.
So in this article, we will get to know all about changing Wi-Fi Passwords and Names.
Steps to Change Your Wi-Fi Password
Step 1: Open the Login Panel for your Network.
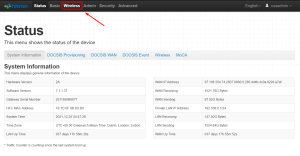
Type 192.168.1.1, 192.168.0.1, 192.168.2.1, or 10.0.0.0.1 (for apple routers) in your web browser. These are the IPs for opening the login admin panel of the router. If one doesn’t work, you can try the other however they depend upon the parent company of your router; you can also search on the web for your router’s IP. Get an idea from this post. Once you see an interface as shown below where you can type a username and password, fill in your login details and you will be redirected to the login panel.

Step 2: Navigate to Wireless settings.
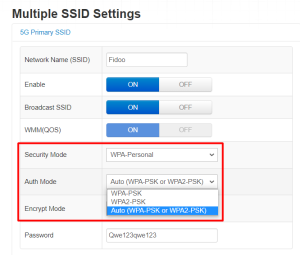
You will see a similar interface as shown below in the image below. Select the network type from 2.4G, 5G, Guest and WPS to change the SSID(name of your network) or password of your wifi.
Step 3: You can also change the network security settings while changing your network’s name and password. Type your new password and save the settings.
You have successfully changed your wifi settings.
We hope you will find this article useful please let us know if you find any issues with this article since it is based upon the information collected by our team. The next article will be related to setting up a guest network on your network.

Help me change my password please
Hi Astrid, did you follow the above-written steps correctly? You can also read our 192.168.o.1 article to learn more about changing your wifi’s password.
Hi
Hey, Rakib hope you find this article helpful!